You’ve finished a draft of your novel or memoir and now you need to assess it. Where do you begin? I think the first step is always to start with the big picture editing. You need a way to assess whether to change anything on that “macro” level (the “micro” level being line-level edits and copyediting; that should come later).
But it can be difficult to see the story holistically if you’ve written 80,000 words, right? You need to be able to look at something you can see all at once within your field of vision.
So here are four tools you can consider to help you do just that. (No affiliate links or anything here.)
1. The Scene List/Spreadsheet
I’ll begin with the most common tool. I’ve written before about how a basic scene list can help you see the big picture. In its simplest form, a scene list is just a two-column table that includes the scene number and a brief summary of what happens within that scene.
(If you find it too difficult to distinguish scenes, then summarize each chapter, but scenes are really a more useful unit of story movement than a chapter, so it might be worth the attempt to distinguish them.)
The summaries you write down will be mostly about what happens in the story, not what the characters are feeling/thinking or about what information is revealed or about what backstory you’ve included.
Examples of Scene Summaries
Here’s an example from the first chapter of Chuck Wendig’s novel Wanderers:
- Shana discovers her sister Nessie’s bed empty and finds her walking up the driveway in her pajamas. Shana tries to wake Nessie but fails and worries Nessie will get hit by a car.
- Shana tries yelling at Nessie, threatening her with violence, killing her with kindness, and then forcibly holding her back. Nessie begins thrashing and heats up and blood spills from her nose. Shana lets her go.
Actually, I’d encourage you to go even simpler with your scene descriptions:
- Shana finds Nessie sleepwalking up the driveway.
- Shana makes several attempts to stop Shana.
But you don’t need to include anything other than what happened in the scene.
This first chapter of Wanderers had plenty of backstory peppered in. We learn of where these girls live (a dairy farm in Pennsylvania) and of their mother’s mysterious disappearance and of Nessie’s previous attempt at running away. But none of that belongs in the scene summary.
Columns to Consider
You can, however, track whatever you want to track in other columns of the spreadsheet. For instance, you could create a separate column for “key backstory reveals,” and list the pertinent info there. Or you could list important information learned by the characters, the state of the characters’ attraction to one another, the character’s movement from misbelief to truth, or anything else that may be important to your genre or your story in particular.
Some basic info about each scene that you could note:
- Word count
- Period/time
- Duration
- POV character
- Characters in the scene
It may be worth your while to trace some things related to the momentum or narrative drive:
- Driving questions
- Turning points
- The change effected by the scene
- Major structural points you’re hitting
- What the character wants
Other Wisdom
I’m not the first to recommend a story spreadsheet like this. Sandra Scofield discusses it in The Scene Book. Emma Darwin uses one for planning her novels. And Shawn Coyne’s Story Grid might be the most famous of these spreadsheets. (And his concepts of value shift and polarity shift are worth looking into to possibly add to your columns.)
I find that most spreadsheets need to be individually catered to the particular project. For some, it makes no sense to trace, say, the POV character or the period/time. But others would benefit enormously from such columns.
And yes, there’s a chance this spreadsheet could get huge. If it begins to intimidate you, then back off. The idea is to distill. So begin with the scene summaries and then, if you find it’s helpful, add some other columns.
Finally, I think there’s something to be said for printing out your spreadsheet on multiple sheets of paper and hanging it on a corkboard or laying it on a table. I’m a believer in being able to look at the entire outline at once.
2. The Inside Outline
Jennie Nash uses a sort of outline with her clients that she calls the “inside outline.” It’s built upon two facets: what happens and why it matters to the main character. She calls these “scene” and “point,” but Nash recommends beginning with a two-page outline, so you’re painting with broader strokes than you are with the scene-by-scene spreadsheet. In the inside outline, a “scene” might incorporate multiple actual scenes.
The Scene and the Point
An example, again from Wendig’s Wanderers (you’ll notice that two scenes become one here):
Scene (what happens): Shana tries to stop Nessie from walking away from home in a sleepwalking state.
Point (why it matters): Nessie represents family and optimism, two things Shana has lost but would like to hold onto.
Because of That
But here’s the next crucial step to this outline, which might elevate it above others you’ve tried. Nash argues that the next scene, or thing that happens, should arise from the previous scene’s point, not from the scene. To keep with my example above, the fact that “Nessie represents family and optimism, two things Shana has lost but would like to hold onto” should lead to the next thing that happens, which in this case would be Shana’s facing off with her dad about sticking with Nessie.
So it looks like this:
Scene (what happens): Shana tries to stop Nessie from walking away from home in a sleepwalking state.
Point (why it matters): Nessie represents family and optimism, two things Shana has lost but would like to hold onto.
Because of that:
Scene (what happens): Shana decides to stay with Nessie despite Dad’s objections.
Got it? It’s not just that one event leads to another. It’s that the event’s point leads to the next happening.
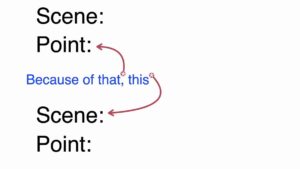
I love Nash’s “inside outline” for two reasons: 1) it helps you to tighten up causality in your story, and 2) it weds character and plot.
Author Accelerator has this free worksheet on the Inside Outline.
And they also offer this class on it.
I have a $20 course that walks you through working with an Inside Outline.
3. The Shrunken Manuscript
The shrunken manuscript idea is so simple: you shrink the font of your novel to somewhere around 6-point font, change the view to approximately 20%, and then make sure you can see multiple pages. That will give you the entirety of your novel in a glance. It looks like this:
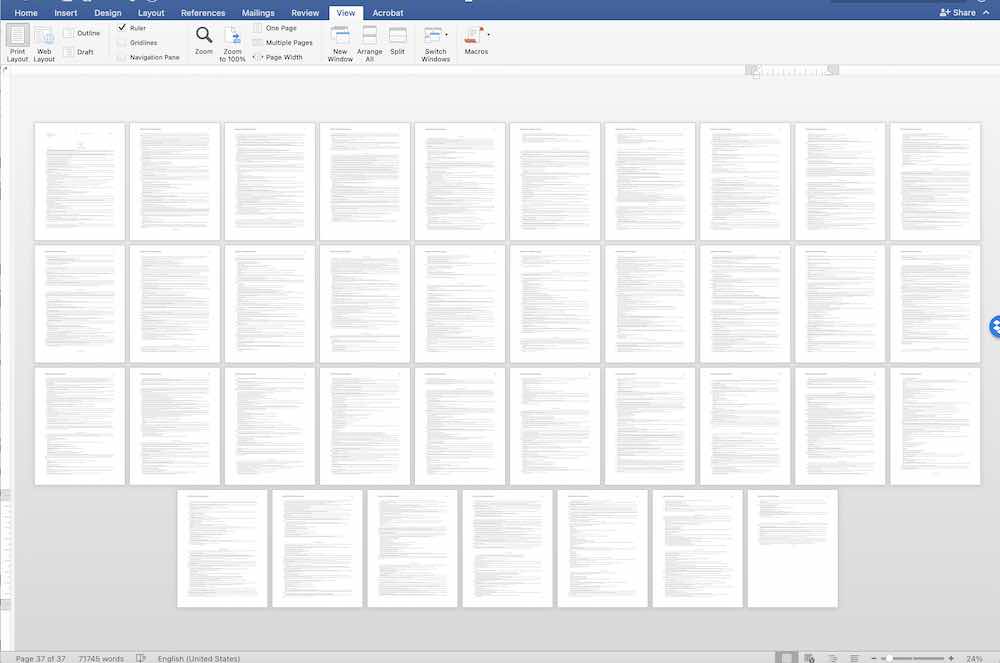
You can’t read it at that level, but you can do some other cool visual things by reverting to original size, highlighting various parts of your story, and then re-shrinking.
What to Highlight
You have a lot of options, of course, but I’ve seen this used in the following ways:
1. Highlight the strongest scenes of the story—approximately one for every 8000 words. So if you have a 80,000-word novel, you can hightlight 10 such scenes. In shrunken form, you should ideally see these strong scenes distributed throughout the story. If you see them bunched up around the beginning, you have a weak ending. If you see them bunched up around the ending, you have a weak beginning. If they forsake the middle altogether, you have a sagging middle. Sure, you may know these things already, but if not, the shrunken manuscript might reveal them to you.
2. Highlight the moments of direct conflict between the antagonist and the protagonist. Again, you might find out that you’re not pinging consistently on that key conflict throughout your story, and depending on your genre, that may be a big problem that wasn’t obvious until seeing it visually laid out for you here.
3. Highlight various subplots. You can check the distribution of, say, a romantic subplot or a buddy subplot.
What you’re looking for with any of these highlights is a certain amount of balance. And the shrunken manuscript can make for a very powerful visual.
All of these suggestions come from Darcy Pattison, by the way, and she has a helpful video tutorial here.
Some tips on shrinking your manuscript
- Make a copy of the document to play with so you can fearlessly mess with it.
- Select-all and make the document single spaced.
- Eliminate white space between chapters, etc.
- Make the font 6 point, but be willing to play with it.
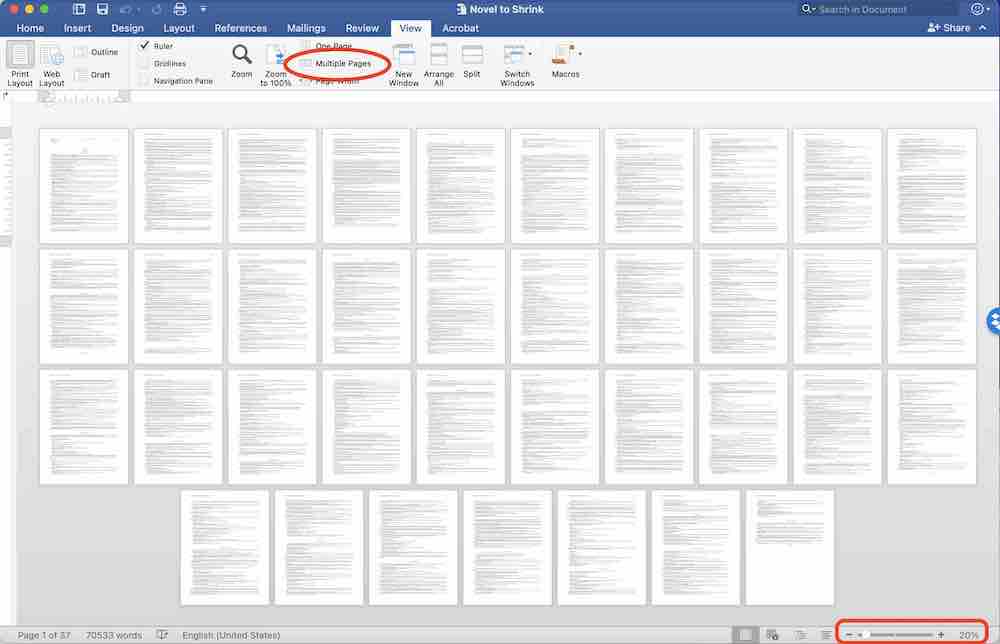
- Change the magnification to 20% or so, but again, be willing to play with it. The goal is to get the whole novel down to about 40-50 pages so you can see about four rows of 10-12.
- You may have to change from single page to multiple pages in the View settings. (The image below shows how to select “Multiple pages” in the Mac version of Word and how to change the magnification level in the lower right.)
3.5. The Series Grid
Finally, there’s the series grid. And I should say two things right off the bat about it: 1) This is not about writing a book series. “Series” in the parlance of Stuart Horwitz’s Book Architecture is defined as a narrative element that is repeated and varied. And 2) I’m not going to fully do justice to this concept with a concise explanation of it here. So consider this method three and a half. And if it piques your interest, check out Horwitz’s book.
The series grid is a spreadsheet, but it’s for those who shy away from structural templates and prizing plot above all other elements of a book. So if you bristle at the idea of a scene list, there may be something for you with this one. Here’s Horwitz on the various types of “series”:
There are many different types of series. There is a character series: when a person repeats varies, they become a character; an object series: when an object repeats and varies it becomes a symbol; the phrase series: when a phrase is repeated, it becomes the message or the mantra of the work; a relationship series: when two or more individuals evolve a dynamic; and the location series: when different things take place in the same locale, adding extra significance to it – to name a few of the major ones. There is, of course, an event series as well, but here we have to be careful because if we’re not, will end up privileging these events above all of the other aspects of the work. Will call the events a plot and make everything else take a backseat.
Horwitz uses this concept to trace everything from motifs to subplots to character development. One example he offers is of how Snape’s character is developed over the course of the seven Harry Potter books. He calls this the “Is Snape fighting for the good guys or the bad guys?” series. You can see several other examples of the series at Horwitz’s site.
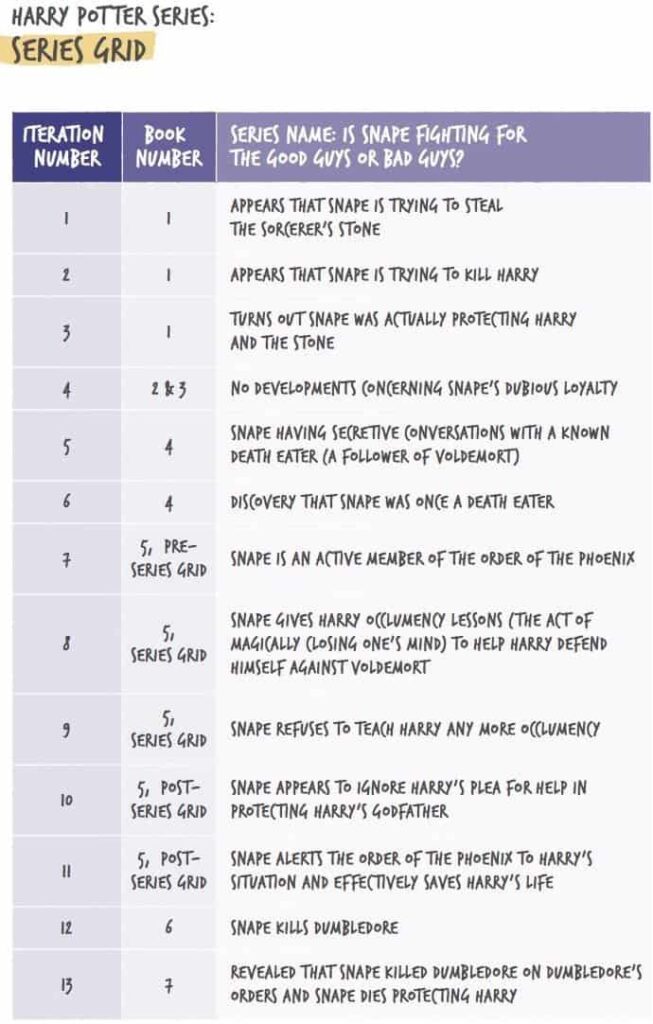
But this one first captured my attention because it felt like a good way to trace both literary elements and subplots. In fact, Joseph Heller created somethign like a series grid for the various characters and subplots of Catch-22. And JK Rowling made one to trace her subplots in Harry Potter and the Order of the Phoenix.
The idea is just to be able to see where these patterns are appearing within your work so you can “time the appearances and interactions of the most important narrative elements to engender dramatic tension and complex emotional and philosophical effects.”
Conclusion
So those are four tools I’ve seen put to use on large projects. Again, the idea here is just to be able to see more clearly the mountain of words you have before you. That mountain can seem daunting and insurmountable when you’re at the base of it, looking up at the prospect of editing and revising. But if you can find a way to fly above the mountain and look down at it, that gained perspective might give you insights about the best possible route to scale for your climb.
If you know of other tools for helping you gain perspective on the big picture of your story, let me know in the comments below.


2 Responses
I’m editing my first book and have been doing editing research. Just wanted to say that this is the best article I’ve seen on big-picture editing. Thanks for this.
Thanks so much, Grant!